This function is not available the when you are using the Formcloud!
Data tables can be used to additionally store form data in a separate database table. It only contains the data that has been defined. The data table is used to conveniently perform queries on incoming form data.
Any number of data tables can be created per form. This makes it possible to create different views of the same form data, for example one table for evaluation and one for a specialist application. The data tables can be stored in the formcycle system database or in an external database.
This article describes data tables as of formcycle 8.6. If you are using an older version, expand the section Data table up to version 8.5.6.
Contents
Creating a data table
- In the form overview, open the Data tables menu item. The configuration dialogue opens. The list of all data tables of the form is shown on the left.
- Create a new data table using the button above the list.
- Under Common settings, enter a Name.
- Under Database connection, select where the table is to be stored: in the system database or in an external database. External databases must first be created as a DB connection.
- Under Data table structure, click New column. Enter a Column name and specify under Content what is stored in this column. Repeat this step for each column you need.
- Click Save. The database table is created.
|
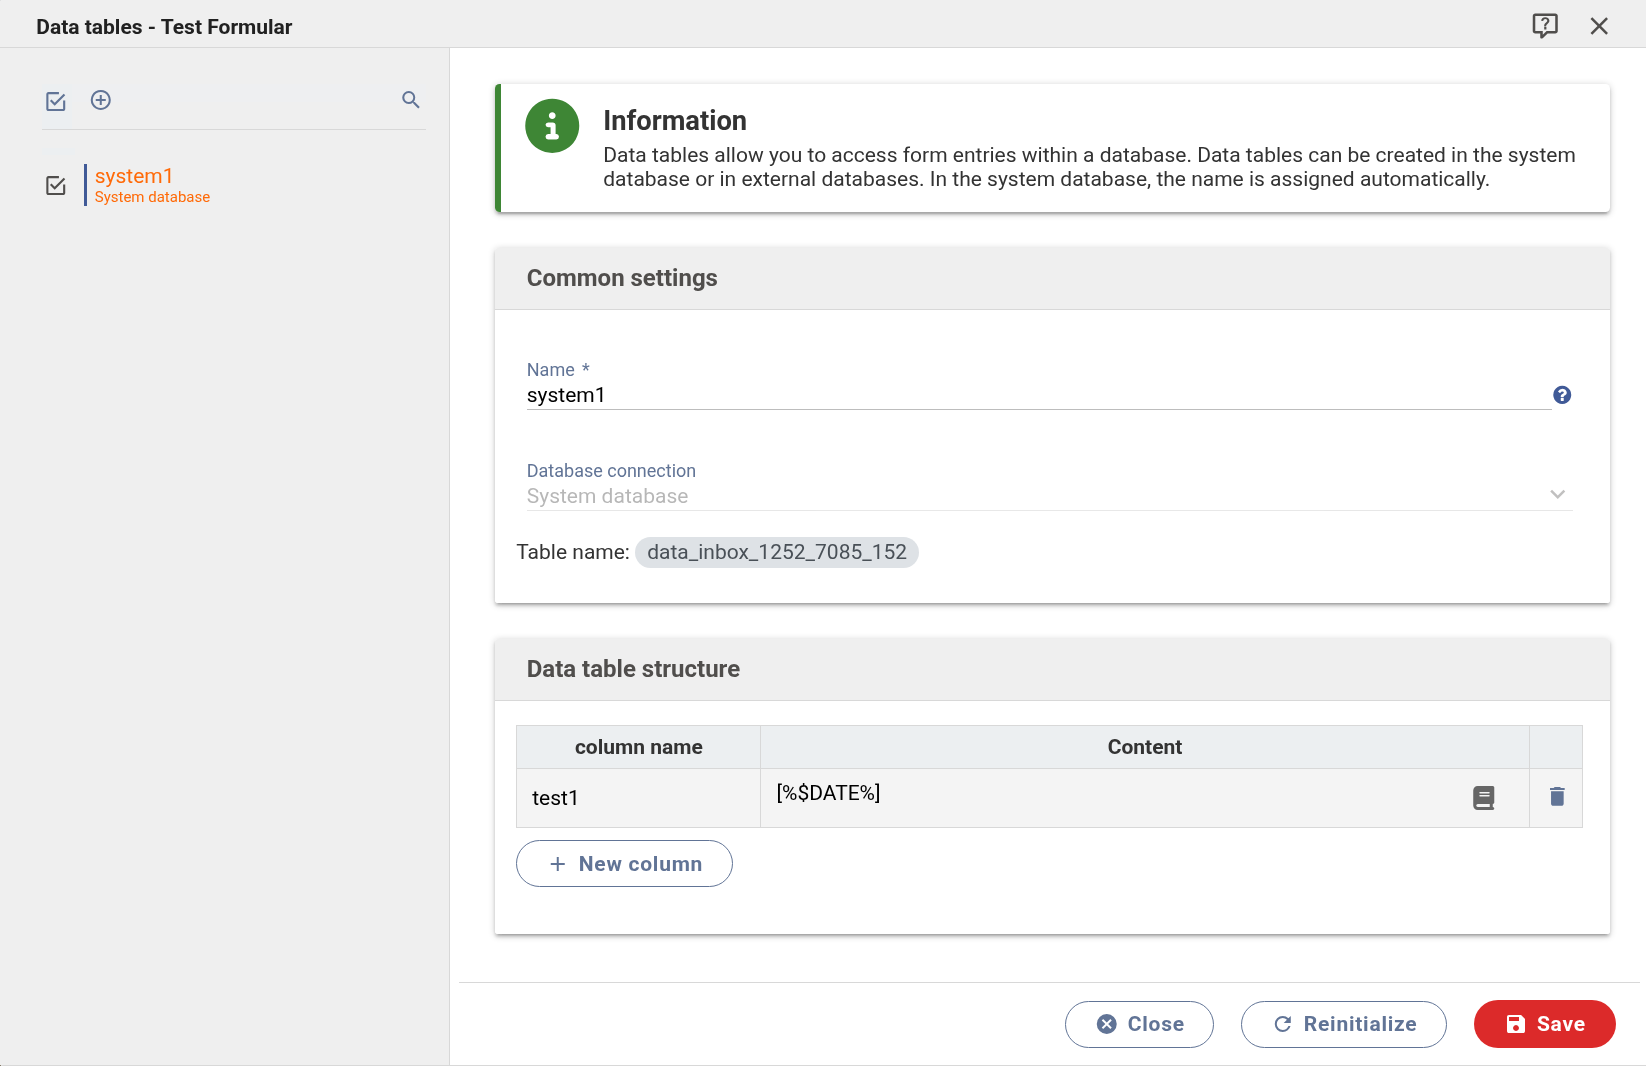
Column name and content
The content of a column can be defined using placeholders. This allows you to store both values from form fields and system information, for example [%tfName%] for the value of the form field tfName.
A column can be deleted using the icons to the right of the column.
Table name
The name of the database table is shown under Table name.
- System database: The table name is generated automatically and is unique per form.
- External database: The table name is partly derived from the name of the data table.
Data tables in external databases
An external data table requires a connection to the database. This connection is created in the client under Data > DB connections. It is then available for selection in the configuration dialogue under Database connection.
Reinitialising a data table
The Reinitialize button completely recreates a data table. The table is emptied and then filled again with the form data received so far. This is useful, for example, if columns were changed or added afterwards and the existing processes should also be available in the new structure.
[INTERN: Klären, ob das Neu-Initialisieren auch für externe Datentabellen gilt und ob es eine einzelne oder alle Tabellen betrifft]
Copying, importing and exporting
- Copying and importing: Existing data tables are transferred with the form and created under a new name.
- Export: For forms with external data tables, the associated DB connections are exported as well.
- Import without a matching DB connection: If there is no matching DB connection in the target system, you can select a different DB connection during import or ignore the data table.
Access to data table
One way of accessing a data table is to create a DB query. This requires a DB connection to the database in which the table is stored.
- External data tables: The DB connection already exists. The DB query can be created directly.
- Data tables in the system database: It is first necessary to establish a connection to the formcycle database, as described below.
Establishing a connection to the system database
- The database connection parameters can be found under System settings > Database via the admin user. The database type and the JDBC connection URL(the address at which the database can be reached) are relevant here.

- You then create a user in the respective database, e.g. a user who is only authorised to perform SELECTs on the database. Instead of the
sauser, you should create a user with fewer rights.
- Then create a new entry in the client under Data > DB connections.

Creating a DB query
- You can now create a DB query. In the settings on the right, specify the DB connection.
- If the query is triggered from the client, i.e. in the browser of the form user, public access must also be permitted.

The data can then be read via the database statement action or via the JavaScript API function $.xutil.getDataQuery().
Show data table up to version 8.5.6
In older versions, exactly one data table can be created per form. The form-specific data table is used to create a separate table in the formcycle database that only contains the data of the selected elements. This can then be accessed by another form or external applications, for example. The column name can also be changed separately for each form field.
Configuring a custom data table
You can access the configuration dialogue for data tables via the Data table button in the form overview.

- All elements of the current form version are listed in the right-hand list.
- The elements can be moved from this list to the left-hand list displayed in the data table using the buttons between the lists. Alternatively, an element can also be moved between available and displayed in the data table by double-clicking.
- Click Save. After saving, the elements in the left-hand list are created as columns in the dynamically created database table.
Column name
In the left-hand list displayed in the data table, a column name can be assigned using the pencil icon to the right of the field name. This column name is then defined instead of the element name in the data table.

Database initialization
If you have made changes to the configuration of the data table, the data table is (re)initialised. During initialisation, changes to the configuration are read in again and the dynamically created database table is recreated. In this process, the dynamically created database table is emptied and filled again with the data from the system table. This also makes it possible to completely recreate the data table for the corresponding form.
Access to data table
Access works as described in the section Access to data table for data tables in the system database.
Was this article helpful?
That’s Great!
Thank you for your feedback
Sorry! We couldn't be helpful
Thank you for your feedback
Feedback sent
We appreciate your effort and will try to fix the article
